My daughter, Sofia, at the dining room table in early morning light. (Shot with a Rolleiflex 6008i medium format SLR camera and 80 mm f/2.8 lens on Tri-X 400 black-and-white film.)
Perfect focus
When sunlight strikes an object, the light reflected from it is scattered in all directions. When you point your camera at the object, a very small cone of the scattered light passes through the aperture and is directed onto the film by the lens. A point in the field of the camera’s view is said to be “in focus” if the cone of light reflected from it is collected once again to a point on the film.

Two-dimensional schematic showing "perfect focus." Rays of light emanating from a point source in the field are brought once again to a point on the film plane.
Circle of confusion
In practice, however, perfect focus is never realized because real lenses — even those made to the highest standards — are not perfect. Simply put, a lens is a curved piece of glass that bends light. If a ray of light entering the “top” of the lens is not bent by exactly the same angle as light entering the “bottom,” for example, a point in the field will appear not as a point on the film, but instead as a fuzzy disc because the rays of light arriving at the film will be spread out. This disc is known as the “circle of confusion” (CoC.) In two dimensions, it represents on the film the uncertainty in the position of a point in the field.

Two-dimensional schematic showing the production of a circle of confusion by an imperfect real lens. Rays of light emanating from a point source in the field are not brought to a perfect point on the film plane, but are instead spread over a small area by aberrations in the lens.
The problem is compounded by fundamental laws of physics. The degree to which light is bent (or, “refracted”) by glass depends upon its wavelength (or, “colour.”) Red light is bent more than blue light. Therefore, when white light traverses a lens, its colours will be spread out in space, with red light being “focussed” in front of the film and blue light being “focussed” behind. Lens designers go to great lengths to correct this “chromatic aberration” but it can never be eliminated perfectly.

Two-dimensional schematic showing axial chromatic aberration. Here, short wavelength blue light is bent less than long wavelength red light owing to a difference in their indices of refraction. The effect is that red light is focussed in front of the film plane, while blue light is focussed behind it. Once again, this uncorrected distortion leads to the development of a circle of confusion on the film.
If the CoC is sufficiently small that it is indistinguishable from a point by the human eye when the negative is enlarged into a print, the photograph will appear to be sharp, or “in focus.” (Please note that, for now, I am assuming that the “depth of field” (DoF) is sufficient to cover the entire scene. DoF is the distance between the nearest and farthest objects in the field that appear to be in focus in the print. I will address DoF in another article.)
The limiting CoC (CoCL) is the diameter of the CoC below which a print produced from the negative will appear to be sharp. If the CoC is larger than the CoCL, the print will appear to be “soft,” or “out of focus.” Three factors govern the CoCL. They are:
- The visual acuity of the viewer.
- The distance of the viewer to the print.
- The degree of enlargement from the negative to the print.
The better the eyesight, the closer the viewer, and the greater the enlargement, the smaller the CoC needs to be in order for the print to appear sharp. Because smaller negatives typically require greater enlargement to make useful prints, the CoCL will be smaller for smaller film formats and larger for larger ones.
The important thing to realize about this list is that none of the factors has anything at all to do with the camera, or its settings, with the lens, with the film, with the scene, or with the moment the shutter button was pressed. All of them are considerations “after the fact.” Moreover, the photographer has control over only one of them, that is, the degree of enlargement. It should also be noted that all three of these factors affect DoF.
An Example
Shown below (at top) is a recent photograph of my son, Michael, taken on a sunny day in the playground near our home. At bottom is a crop showing an enlargement of the field of view above his left shoulder. The complete image, reproduced at small scale, gives the impression that the whole scene is acceptably in focus. Depending on the quality of your screen, your distance from it, and how good your eyes are, you may be able to detect a slight softness in the "O" in the centre of the tic-tac-toe board behind him. This softness is immediately apparent in the enlarged crop. You may also notice that the features of his jacket are not quite as sharp as they appear to be in the small image. All of this is to say that the enlarged image has a shallower DoF than the small one.
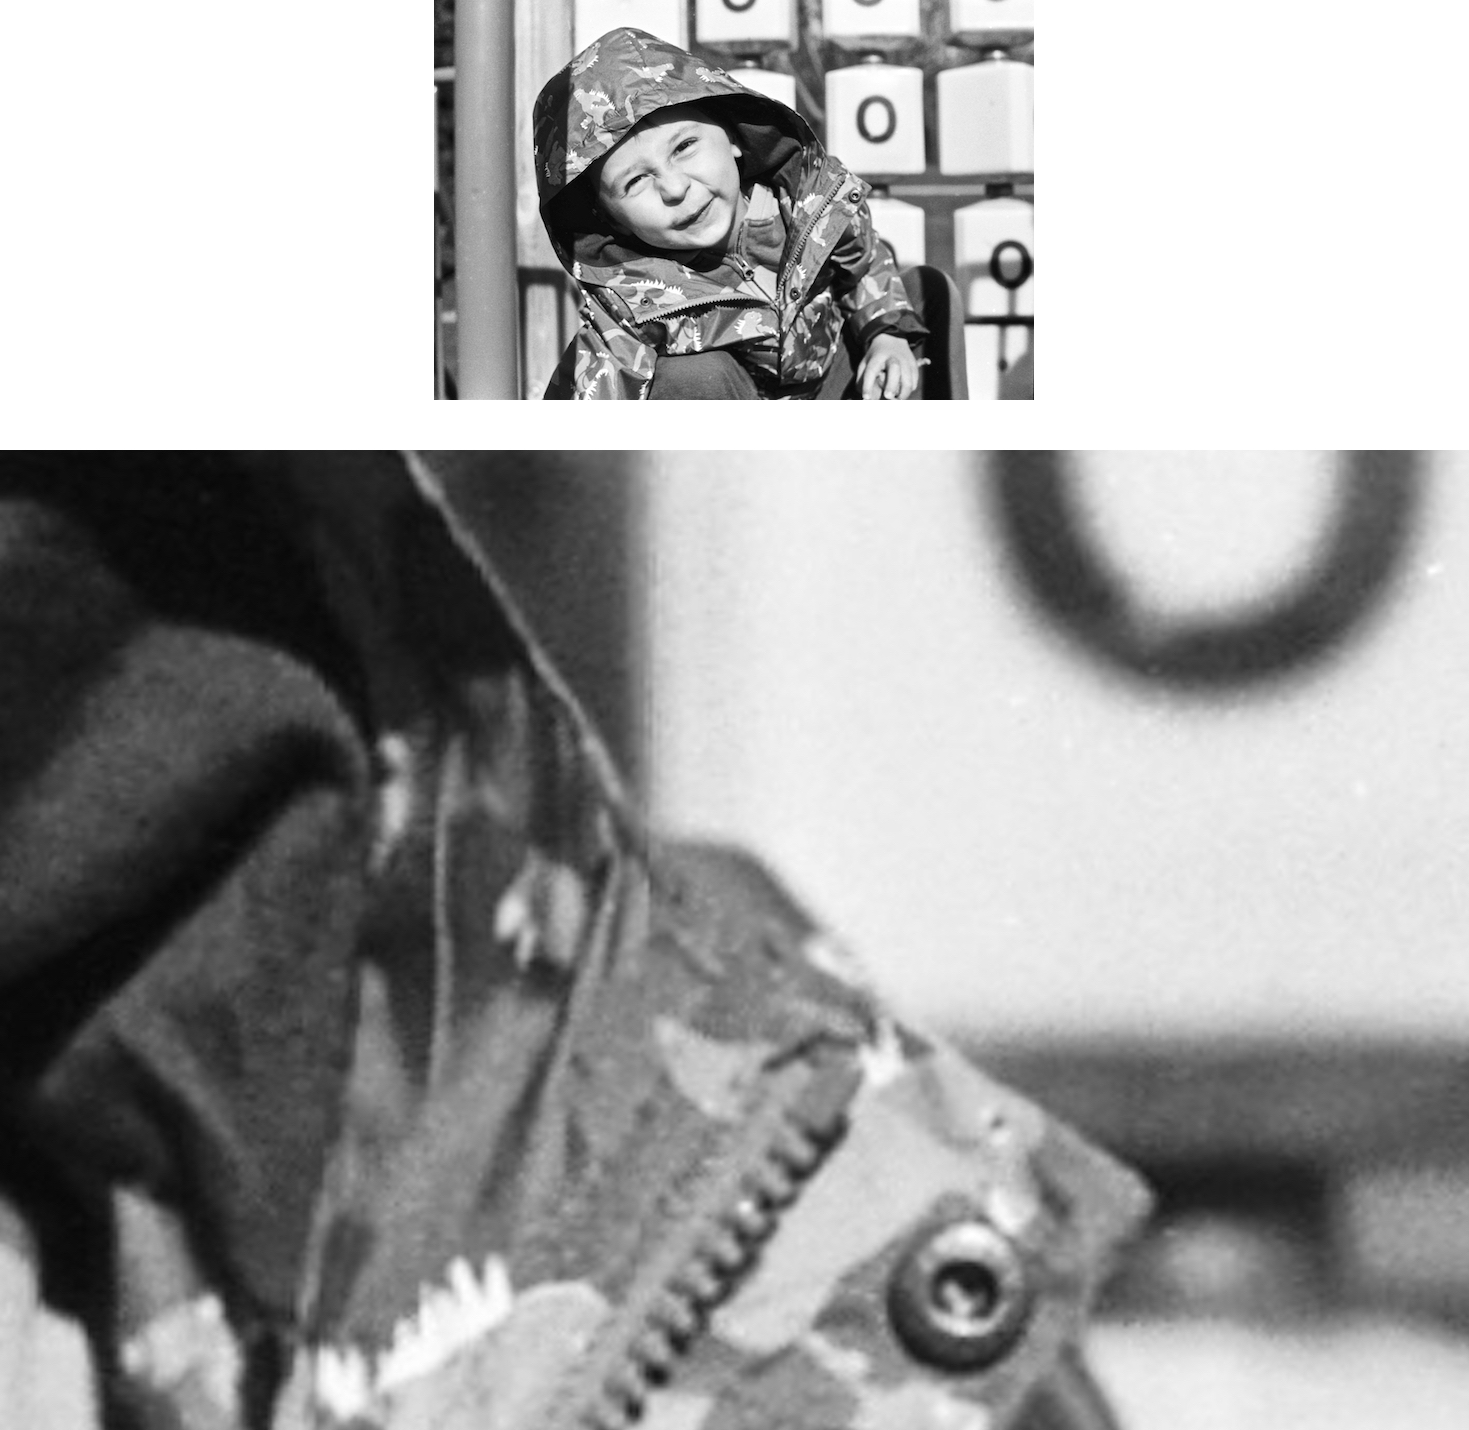
Illustration of the effect of enlargement on perceived focus. (Shot with a Nikon F3 and 50 mm f/1.4 lens on Fomapan 200 black-and-white film.)