Developing Black-and-White Film at Home (Part 2)
Preparation
Before you begin developing at home, you’ll need a few pieces of equipment and some chemicals. I’ve had most experience with the Kodak line of chemicals, but you could just as well use others. Most of the items listed here are available through Adorama and B&H Photo, although some of them cannot be shipped outside the USA.
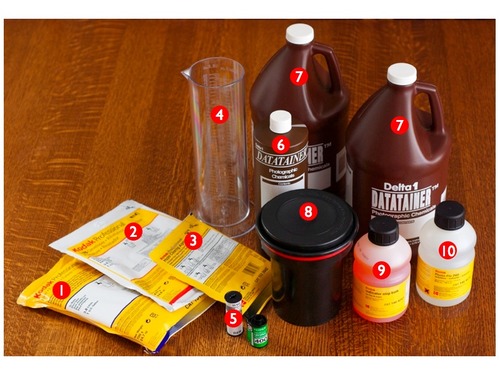
You are going to need these pieces of equipment (numbers in parentheses refer to the figure above):
A developing tank. (8) I use a Patterson universal tank with plastic reels. This is the light-tight container in which you’ll do all of your chemistry.
A measuring cylinder. (4) If you want, you may buy several of different sizes, but I use only a single 2 L cylinder. You’ll need this to measure out your chemicals with reasonable accuracy. You may also use a set of measuring cups — $17.95 for 6.
Air and light-tight containers to store your chemicals. I use 4 L (1 gallon) brown plastic bottles with screw top caps for my developer, fix, and stop (7); and a 1 L (1/4 gallon) bottle for my clearing agent (6).
A stopwatch and a thermometer, accurate to 1 degree. In chemical jargon, film developing is a kinetic process. In other words, it’s a chemical reaction in motion that you have to stop when it’s part-way finished. The pace and extent of the reaction are sensitive to temperature and time, respectively. For B&W developing, you need to be able to measure the former and control the latter pretty accurately. I use a mercury-in-glass thermometer from my days as a chemist, but dial-type thermometers are just fine, too — $16.95.
Bull dog clips. I use these to hang the film for drying.
Sleeves. Once you’ve developed your film, you’ll need a safe, dust-free place to store it, preferably flat. Trust me: you need to be disciplined about maintaining a well-organised filing system for all your negatives. The more you shoot, the more negatives you accumulate, and entropy can overwhelm you very quickly. Remember: your negative is your primary source, the well-spring of your digital and print copies, and your ultimate back-up. Losing it is akin to losing your RAW file in the digital world, only worse.
You’ll also need these chemicals:
Developer. (2) I use Kodak D76 — a good, all-purpose developer, applicable to most films — $5.95 to make 4 L (1 gallon) stock solution. This chemical amplifies the latent image on your exposed film. You’ll use 125 — 250 mL for each roll.
Stop. (9) I use Kodak indicator stop — $6.29 to make 32 L (8 gallons). This chemical arrests the developing process. You’ll use 250 — 500 mL per roll.
Fixer. (1) I use Kodafix — $6.95 to make 1 gallon solution. This chemical renders the final, light-insensitive negative. You’ll use 250 — 500 mL for each roll.
A clearing agent. (3) I use Kodak Hypo Clearing Agent — $5.95 to make 20 L (5 gallons). This chemical removes residual fixer from your negatives. It’s not absolutely necessary, but I find that it improves the transparency of the unexposed areas. Sometimes negatives will emerge from the tank with a pink or purple hue. Treating them with a clearing agent after fixing takes almost always takes care of this colour cast. You’ll use 125 mL for each roll.
A de-wetting agent. (10) I use Kodak Photo-flo — $7.95 for approximately 500 mL (16 oz). Once again, this is not absolutely necessary, but it helps to ensure even drying of your negatives. Basically, it’s a detergent, which lowers the surface tension of water clinging to the film thereby helping it to flow smoothly off the negative for streak- and spot-free drying. You’ll use only a couple of drops per roll.
And last, but not least, a roll or two of exposed film to develop (5).
Now on to Part 3, the Process.
Latest blog posts